Materials
All HSK - DIN 69893 A Toolholders are made of case-hardened steel. The supply of the material, made by the main Italian steel mills, is accompanied by the 3.1 UNI EN 10204 certifications.
Thermal treatments
A carburization is carried out with a depth of 0.4 - 0.5 mm in order to achieve a value of HRC hardness of 58 ± 2 and a tensile strength of 800-1000 N / mm2.
Grinding
After the burnishing, the parts are grinded externally and internally, including the threads of the nuts that tighten the collet.
Quality
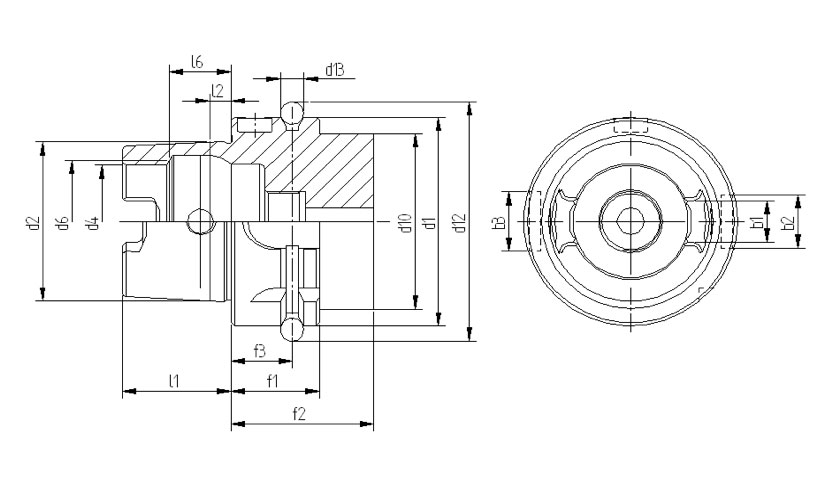
Technical details of the cone

|
HSK 32 |
HSK 40 |
HSK 50 |
HSK 63 |
HSK 100 |
| b1 |
7,05 |
8,05 |
10,54 |
12,54 |
20,02 |
| b2 |
7 |
9 |
12 |
16 |
20 |
| b3 |
9 |
11 |
14 |
18 |
22 |
| d1 |
32 |
40 |
50 |
63 |
100 |
| d2 |
24 |
30 |
38 |
48 |
75 |
| d4 |
17 |
21 |
26 |
34 |
53 |
| d6 |
19 |
23 |
29 |
37 |
58 |
| d10 |
26 |
34 |
42 |
53 |
85 |
| d12 |
37 |
45 |
59,3 |
72,3 |
109,75 |
| d13 |
4 |
4 |
7 |
7 |
7 |
| f1 |
20 |
20 |
26 |
26 |
29 |
| f2 |
35 |
35 |
42 |
42 |
45 |
| f3 |
16 |
16 |
18 |
18 |
20 |
| l1 |
16 |
20 |
25 |
32 |
50 |
| l2 |
3,2 |
4 |
5 |
6,3 |
10 |
| l6 |
8,92 |
11,42 |
14,13 |
18,13 |
28,56 |
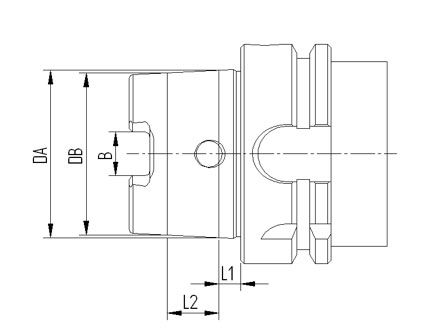
Tolerance of the cone
The taper complies to the AT3 class according to DIN standards and to the following table:

| HSK |
L1 |
L2 |
D.A. |
D.B. |
B (only type A) |
| 32 A |
3,2 |
7,3 |
24
|
23,27
|
7,05 ± 0,04 |
| 40 A+E |
4 |
9,5 |
30
|
29,05
|
8,05 ± 0,04 |
| 50 A+E |
5 |
11 |
38
|
36,9
|
10,54 ± 0,04 |
| 50 F |
4 |
9,5 |
30
|
29,05
|
- |
| 63 A+E |
6,3 |
14,7 |
48
|
46,53
|
12,54 ± 0,04 |
| 63 F |
5 |
11 |
38
|
36,9
|
- |
| 100 A |
10 |
24 |
75
|
72,6
|
20,02 ± 0,04 |
|
Features and use
Central, axial coolant supply through coolant tube.
Torque transmission via two key slots at end of taper.
Two slots on collar for tool magazine, location edge. Hole for data carrier DIN 69873 in collar.
Used on machining centres, milling machines, turning machines special machines with automatic tool change.
Balancing
In accordance with company's internal quality procedures, Toolholders are pre-balanced in class G 6,3 a 8000 rpm for 1 min. balancing is performed almost for each toolholder of this product family, using Haimer Balancing Machines up to the class G1 at 40000 rpm for 1 min.
Coaxiality
Collet Chucks
Parts are produced according to DIN69882-6, that allows a maximum runout deviation of 0.005 mm for DIN6499 Collet Chucks
Shell End Mill Adaptors
All Toolholders meet the requirements of the DIN69882-2 standard, that allows a coaxiality of 0,01 for Ø 16-22-27-32.
Weldon / Whistle Notch End Mill Holders
In compliance with DIN 69882-4, the hole is made in tolerance class H5, with an average coaxiality value of 0.005 mm
Quality of production
We perform accurate tests on 100% of our production through certified instrumentation:
- Certified taper control, by calibrated gauges
- Checking of threads and seats with taper clamps and collet holder, with MG Calibri gauges
Quality Pagnoni
Production


